- Bonding Products
How to use industrial adhesives
Contents
Fixing in the right position -Application position and balance
Deciding where and how to attach is a major consideration, especially when you’re working with delicate components such as lenses, where even the slightest misalignment is unacceptable. When applying the adhesive, a balanced position is critical to avoid misalignment.
For example, when attaching a lens, which typically requires four adhesive points, the application points should be symmetrical to the center of the component for proper balance, as shown in the figure to the left. However, if the center of your component and the adhesive aren’t aligned, as shown in the right figure, you run the risk of component misalignment due to shrinkage during cure or expansion from heat.
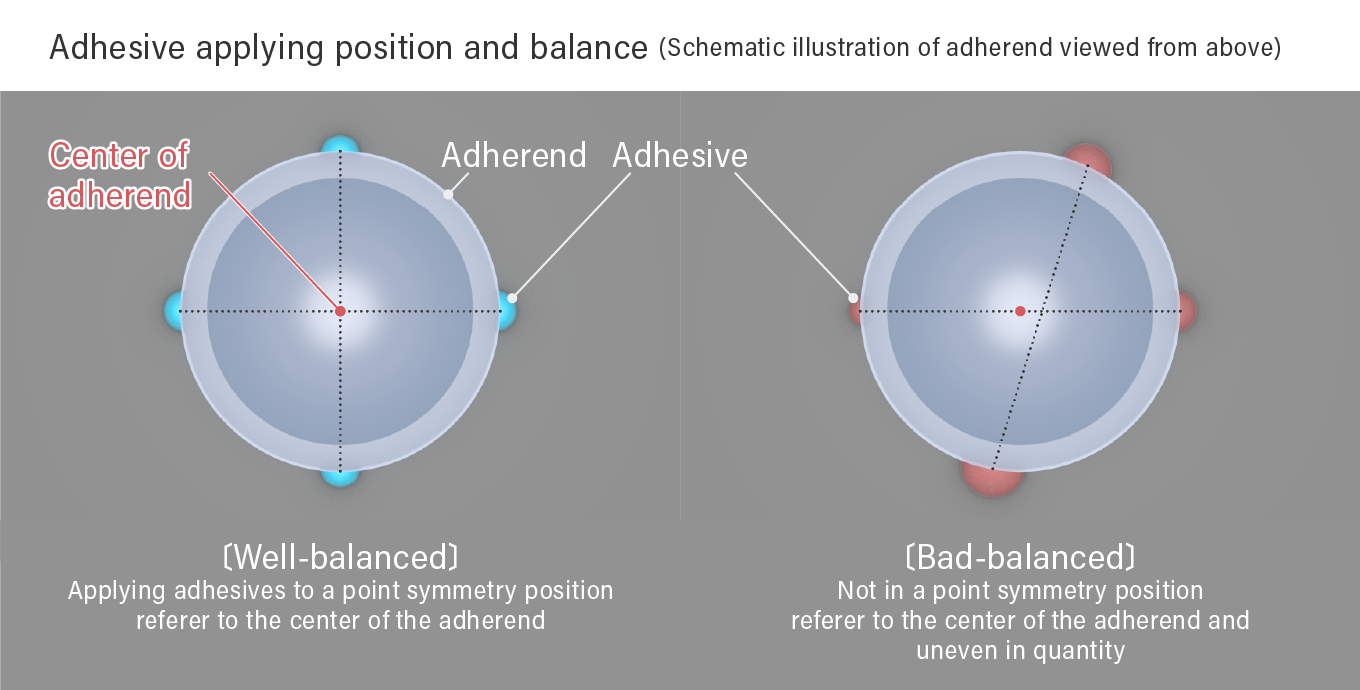
If the amount of adhesive applied is not consistent, as shown in the figure, there is a risk that shrinkage or thermal expansion will affect the positional accuracy of the fixation. Therefore, it is important to balance the position of the application with the amount of adhesive used. This will ensure consistency and is an essential step in preventing potential misalignment.
How to Improve Positional Accuracy in Fixation -Control of the Amount of Coating
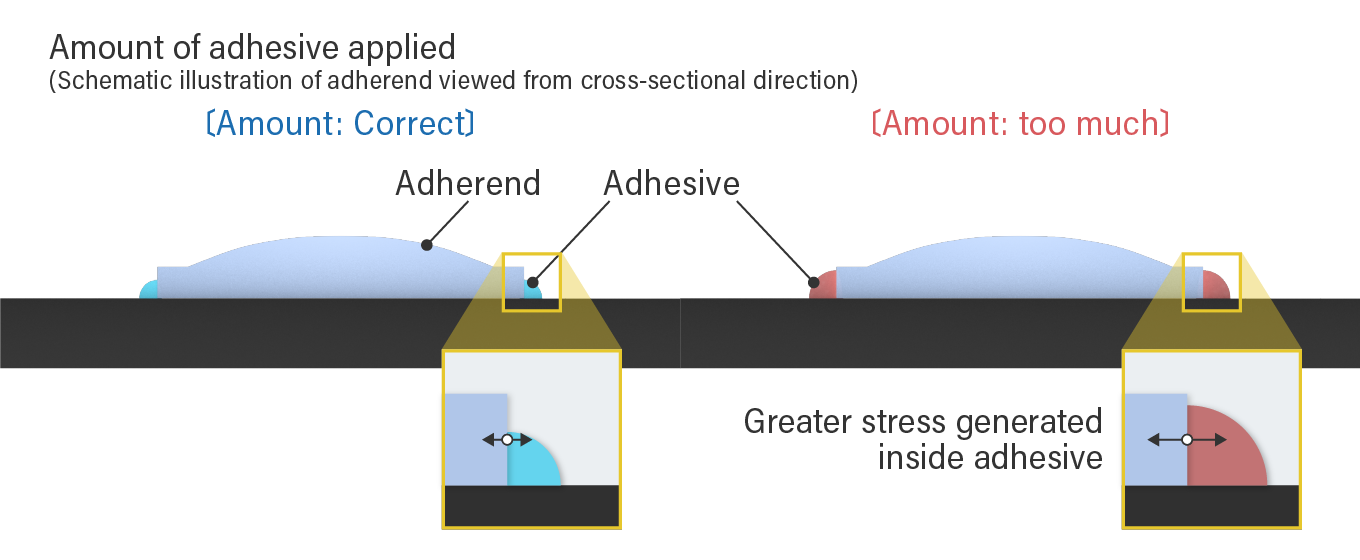
The more adhesive is applied, the stronger the force to fix an object in place.
On the other hand, as the amount of adhesive used increases, the accuracy of the hold tends to deteriorate.
Liquid adhesives shrink in volume toward the center during the curing reaction. In this process, “stress” toward the center is generated inside the resin, and as a result, the resin pulls the adherend.
Since the pulling force is proportional to the amount of adhesive used, the greater the amount used, the greater the pulling force, and as a result, the adherend will shift from the correct position. In addition, this force is greatest at the periphery of the adhesive, which may cause distortion or curvature of the adherend, thereby preventing correct fixation.
In addition, when fixing electronic components, positional accuracy during equipment use is of the utmost importance. Therefore, resins’ “expansion and shrinkage” must also be considered after the adhesive has cured. Among the components that constitute an electronic device, adhesives are materials with relatively large thermal expansion. Therefore, if the amount of adhesive applied is too large, the expansion and contraction will be large when the temperature rises and falls, which will cause the lax fixation of the parts and poor positional accuracy of the parts.
To achieve high precision in fixation, it’s beneficial to use the least amount of adhesive possible while still achieving the desired strength. While the instinct may be to use more adhesive for a stronger bond, it is wise to be conservative. Of course, it is also important to consider the coefficient of linear expansion of the bonded components.
Curing process determines fixing performance
Adhesives are designed to provide optimal results when “all of the adhesive cures evenly,” which is facilitated by an appropriate curing process. In particular, UV-curable adhesives, which cure much faster than others, such as thermo-curable adhesives, use ultraviolet light for the curing process. This unique feature requires careful attention to several key aspects.
Point (1) – Be careful about the “illuminance” of ultraviolet rays when using UV-curing adhesives
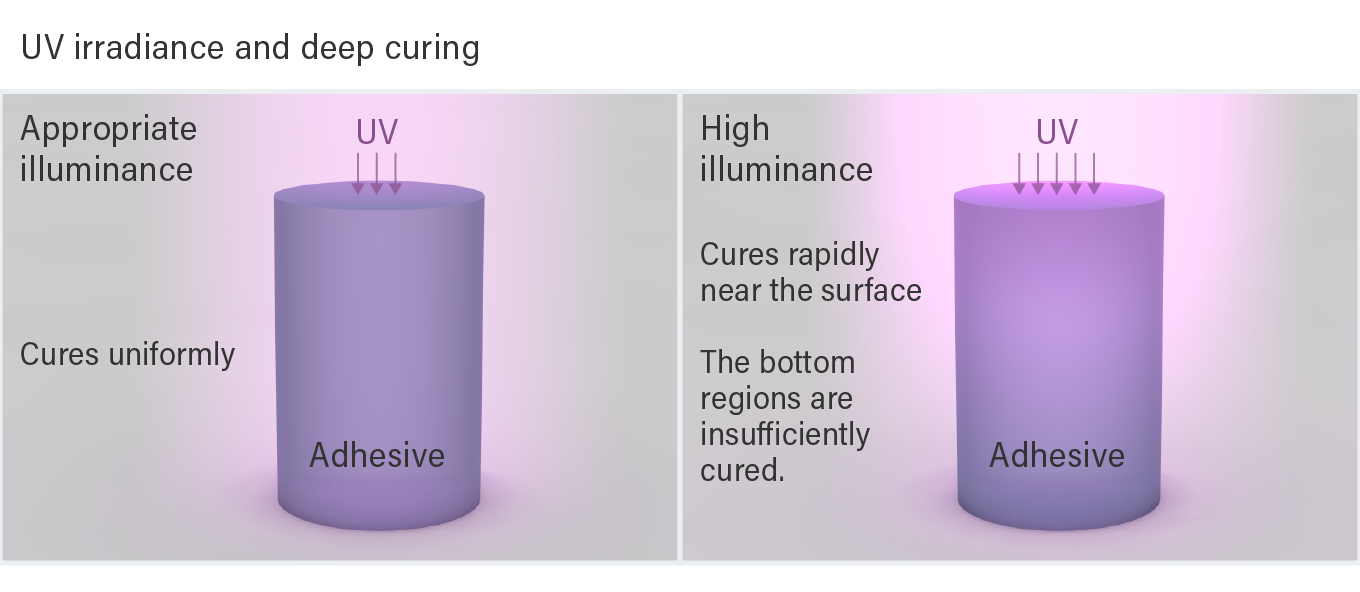
When working with UV-curable adhesives, the “illuminance” of the UV light warrants close attention. If the illuminance is high, the curing process will be fast. However, very high illuminance can cure quickly to the surface and subsurface of the adhesive. The cured resin preventis the UV light from reaching deeper region.
This could result in uneven curing, with some regions not receiving sufficient exposure and remaining inadequately cured. Although operators may be inclined to use high-intensity lighting to be short tact time adhesive curing, uneven curing could compromise the stability of the fixation, resulting in poor positional accuracy and adverse functional effects.
To optimize adhesive performance, it is preferable to cure gently under optimal illuminance that allows for thorough and uniform curing throughout the adhesive application.
Point (2) – Acrylic UV-curable adhesives should be careful of “low illuminance”.
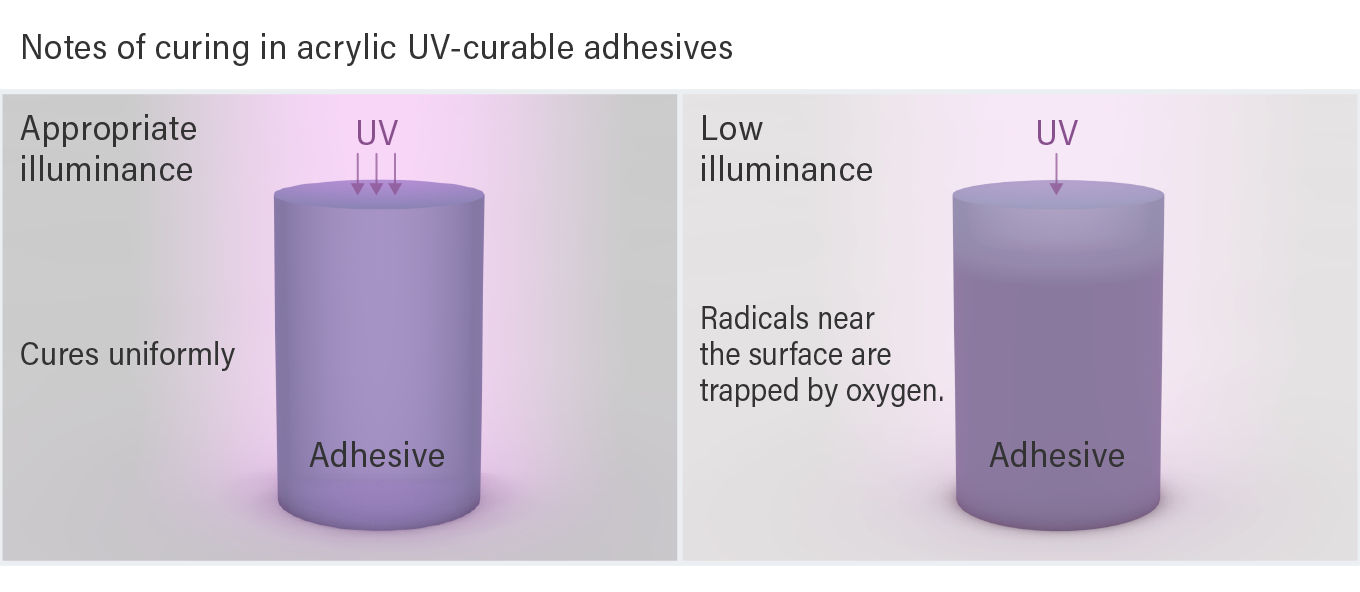
Among UV-curable adhesives, acrylics present an additional challenge. Low illumination can cause oxygen to inhibit the curing process. Acrylic adhesives utilize radical polymerization in the curing reaction by selecting substances that readily generate radicals as polymerization initiators.
These radicals are highly active and readily combine with atmospheric oxygen. When UV light intensity is low, “oxygen inhibition” occurs, where radicals near the adhesive surface are scavenged by ambient oxygen before polymerization begins. As a result, the adhesive remains tacky due to inadequate curing of the surface layer.
In addition, incomplete curing can cause the low-molecular-weight components of the adhesive to vaporize. The gases can potentially contaminate surrounding components and cause unforeseen problems. That’s why it’s critical to expose acrylic UV-curable adhesives to cure at appropriate conditions.
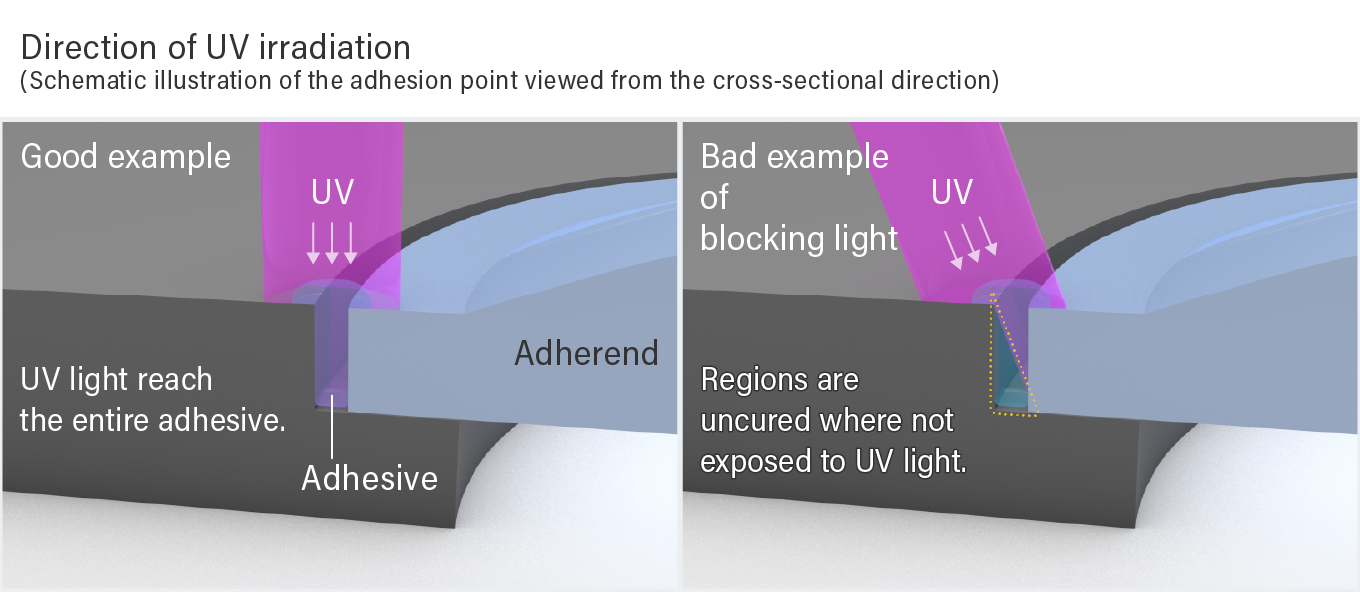
Point (3) – Direction of UV irradiation
In order to fully utilize the performance of UV-curable adhesives, the UV light must effectively reach the entire adhesive. In certain situations, however, it may be difficult for UV light to penetrate the adhesive because it is often located between two or more adhered components.
Due to the inherent properties of light, which only allows movement in a straight line, shaded areas remain uncured. For uniform curing, it is critical to determine a beam direction that provides enough UV light to illuminate the entire adhesive.
Point (4) – Light transmittance of adherend
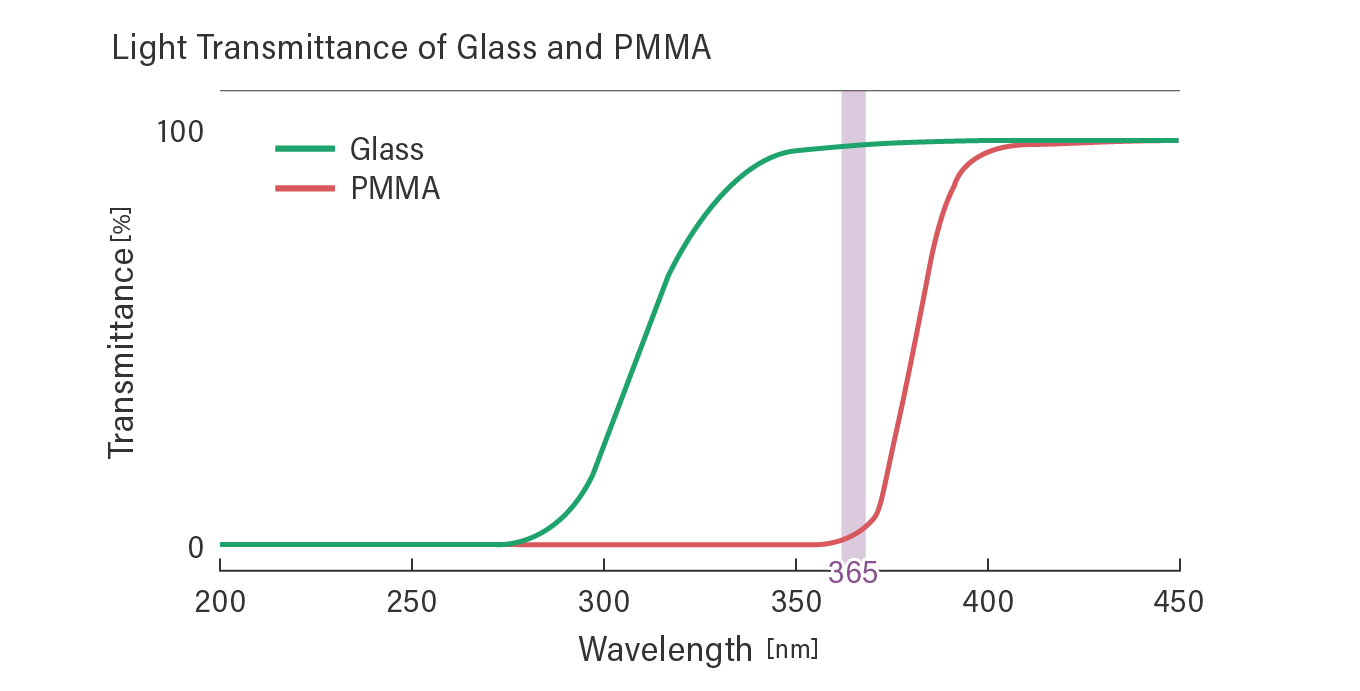
When curing UV-curable adhesives using UV light through a material, the transmittance of the material must be considered. With today’s commonly used UV LEDs, UV radiation has a center wavelength of approximately 365 nm.
The graph here shows the transmittance of glass (indicated by the green line) and a transparent acrylic sheet, PMMA (indicated by the pink line) versus light wavelength. Glass transmits light at wavelengths above 300 nm, while acrylic doesn’t transmit light until the wavelength reaches about 370 nm.
Therefore, if a UV LED with a center wavelength of 365 nm is the light source, it can pass through glass but barely through PMMA. As a result, the adhesive doesn’t cure quickly in the case of PMMA. In such a scenario, either the wavelength of the UV light used should be adjusted to a longer wavelength, or the irradiation direction should be innovatively designed as mentioned above. If the curing wavelength is adjusted, an adhesive should be selected to match that wavelength.
The transmittance of a material can vary significantly depending on whether or not it has a surface treatment. If you’re planning to cure by irradiating the material with ultraviolet rays, it’s a good idea to check the transmittance of the actual material to be used before determining the irradiation conditions.
While this article focuses primarily on application and curing issues, there are approaches to addressing these concerns from an adhesive perspective. At Dexerials, we offer a variety of adhesives tailored to your specific needs and can provide guidance on how best to use them. Please don’t hesitate to contact us for more information.
- SHARE
 Back to top
Recommended products related to this article
Bonding Products Popular articles